Wednesday, October 31, 2012

Costume Galore!

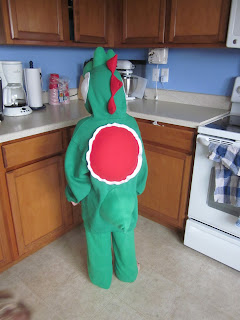
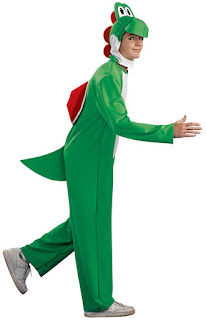
I was inspired to do a Flintstones theme this year for the family. Eric and I are Fred and Wilma, Emily is Pebbles and Caleb wanted no part of it. He wanted to be Yoshi. Finding a Yoshi costume in the stores was impossible and the costumes online were $50+ and totally lame:
No way was I paying $50 for that costume... I could make something way better!

I sat and waited for inspiration for weeks, we were getting close to Halloween and I finished all of our costumes except for Yoshi. I told Caleb that he may need a backup costume (Clark Kent) but I hadn't completely given up yet. So one day I was surfing through Google images and the inspiration hit me... use a hoodie to make the costume! I searched Yoshi Hoodie and came up with this link: http://www.instructables.com/id/YOSHI-HOODI/ GENIUS!!! I was immediately inspired and ready to go. After I got my head wrapped around how to make it, there was no stopping me, it was a matter of days and Yoshi was done. 


I found the hoodie at Walmart and they happened to have fleece fabric that was almost the same color for the nose, eyes and pants. I had leftover red fleece for the shell on the back and his spikes. I also had leftover white felt for the eyes, belly, cheeks and shell. Total cost of this costume.. $17! 

I tried to follow the tutorial in the link but found it hard to follow as I think everyone's creative brain works differently. So I figured it all out on my own. Using a stuffed Yoshi as my tutorial.

 I was so surprised at how much Geometry I had to dust off to design this costume. I used a compass, protractor, Pythagorean theory, angles, and the formula for the circumference of a circle. So allow me to just give a shout out to Mrs. Webster, my 9th grade Geometry teacher.... You totally made this costume possible! :) Next time a student asks "When will I ever use this in the future?" just say "When you're future child wants to be Yoshi for Halloween and you're too thrifty to pay top dollar for a cheaply made costume!" 

The rest of the family turned out pretty awesome as well and the costumes were simple, 30 minutes or so a piece. 


I made a Wilma dress out of felt but then remembered I had a white sundress that looked so much better on me. My costume consisted of a $2 bag of big pearl-ish beads and a $2.50 can of hair color. 

Fred and Pebble's tops were made out of felt and a couple triangles cut out of black felt. The tie was felt as well. I used a long strip of felt, tied it like a tie then cut it into the shape of Fred's tie. I made pebbles shorts out of an old t shirt of mine. You can't see the bone in her hair very well but it's made out of felt as well... and glued onto a hair clip. Total cost of Fred and Pebbles, all together... $12!

Owen is a fireman, totally store bought, but I got it last year, after Halloween for $3, so I didn't feel the need to save money on his costume by making it myself. I had a thought to make him a Bam Bam costume out of all the leftover felt I have, but it will be too cold for him to wear it outside. 

So there you have it! My (almost) DIY Halloween!
Monday, October 22, 2012

Go Bulldogs... and other hair bows!

I started making hair bows when Emily was little. I started simple and next thing I knew she had dozens of bows. I began selling them in a local consignment shop but never took the venture any farther than that because the more bows I had to make, the more I didn't enjoy it. Emily hardly ever wears the bows I make lately so I haven't made much in the way of bows lately. But she had a chance to cheer at the varsity game last Friday so I thought I'd try out a new bow to show some spirit, the Pony-O! This was so much easier and quicker to make than the other bows. I whipped up several of them in 30 minutes and have made even more since then.

I made a one with Vicksburg colors, one with Halloween colors and a "I love Pink" one:

How it looked in the hair


One happy cheerleader, she didn't seem to care that it was cold and rainy:


I used THIS YouTube video. I wish I could say this was my original idea... but I must give credit where it is due!

Tuesday, May 29, 2012

Girl Scout Cookie Costumes


 Sitting at a cookie booth outside of a local grocery store, a fellow Girl Scout mom and myself were inspired by the little cookie characters on the cookie boxes. We thought it would be great to have costumes for the girls to wear when we sell cookies. As an after thought we realized how cute it would be for them to dress up as cookies in the upcoming "Do Dah" parade. I definitely didn't know what I was getting myself into when I said I would do it. I was the only sewing momma in the group so I was on my own. I did enlist my mom for some help on cutting and design ideas. She was so helpful. I'm pretty happy with how they turned out, there are a few minor things that bug me, but I'm sure no one else will notice, so I won't point them out :) 

Before we used the cookies again I decided to add a little sash with the names on the Tagalong and Thin Mint. It was a quick 1 hour project to make the 2 sashes and I think they make the cookies a lot more recognizable. The sash and letters are made out of felt. I printed out letter stencils online, traced them on the felt, cut the letters out, and hot glue them onto the sash.

Next on the craft list is Tutus with all of the color of the daisy pedals. That is an easy craft and I'm teaching the other moms how to make them as well. It should be fun!


I have finally written out a tutorial for this project! http://projectbonbon.blogspot.com/2013/02/girl-scout-cookie-costume-tutorial.html