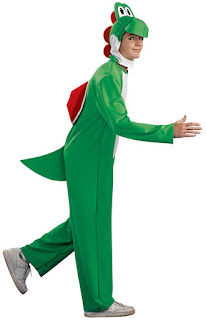
No way was I paying $50 for that costume... I could make something way better!
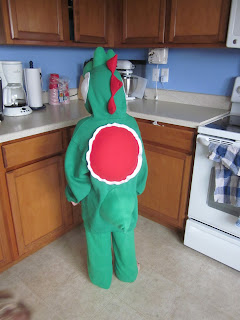
I sat and waited for inspiration for weeks, we were getting close to Halloween and I finished all of our costumes except for Yoshi. I told Caleb that he may need a backup costume (Clark Kent) but I hadn't completely given up yet. So one day I was surfing through Google images and the inspiration hit me... use a hoodie to make the costume! I searched Yoshi Hoodie and came up with this link: http://www.instructables.com/id/YOSHI-HOODI/ GENIUS!!! I was immediately inspired and ready to go. After I got my head wrapped around how to make it, there was no stopping me, it was a matter of days and Yoshi was done.
I found the hoodie at Walmart and they happened to have fleece fabric that was almost the same color for the nose, eyes and pants. I had leftover red fleece for the shell on the back and his spikes. I also had leftover white felt for the eyes, belly, cheeks and shell. Total cost of this costume.. $17!
I tried to follow the tutorial in the link but found it hard to follow as I think everyone's creative brain works differently. So I figured it all out on my own. Using a stuffed Yoshi as my tutorial.
I was so surprised at how much Geometry I had to dust off to design this costume. I used a compass, protractor, Pythagorean theory, angles, and the formula for the circumference of a circle. So allow me to just give a shout out to Mrs. Webster, my 9th grade Geometry teacher.... You totally made this costume possible! :) Next time a student asks "When will I ever use this in the future?" just say "When you're future child wants to be Yoshi for Halloween and you're too thrifty to pay top dollar for a cheaply made costume!"
The rest of the family turned out pretty awesome as well and the costumes were simple, 30 minutes or so a piece.
I made a Wilma dress out of felt but then remembered I had a white sundress that looked so much better on me. My costume consisted of a $2 bag of big pearl-ish beads and a $2.50 can of hair color.
Fred and Pebble's tops were made out of felt and a couple triangles cut out of black felt. The tie was felt as well. I used a long strip of felt, tied it like a tie then cut it into the shape of Fred's tie. I made pebbles shorts out of an old t shirt of mine. You can't see the bone in her hair very well but it's made out of felt as well... and glued onto a hair clip. Total cost of Fred and Pebbles, all together... $12!
Owen is a fireman, totally store bought, but I got it last year, after Halloween for $3, so I didn't feel the need to save money on his costume by making it myself. I had a thought to make him a Bam Bam costume out of all the leftover felt I have, but it will be too cold for him to wear it outside.
So there you have it! My (almost) DIY Halloween!


Stumbled across this post after finding the original tutorial on instructables. I was wondering if you had the pattern for the tail or could tell me what you did? Making this for myself...as a surprise joke on some friends
ReplyDeleteI just made three triangles based on the size i wanted the tail to be and sewed them together as a pryamid (well, a pryamid without a bottom). Once they were sewn together, I trimmed the bottom so it was more circular, stuffed it, pinned it on so that the base of the tail was round and not triangular and hand stitched it on. If you need help with the measurements i can go into more detail!
ReplyDeleteMeasurements would be great if you still have them, if not I can try to wing it. I'm making the hoodie from scratch too...this is either going to turn out exactly how I envision it or an epic failure, but I'm willing to accept the challenge I put on myself haha. Thank you much for your input! I am going to hopefully blog about this project once it's finished (assuming I don't screw it up!) and will make sure back to you, though right now I think I am my only reader haha. :)
ReplyDeleteOk, I dug out our costume so I could measure the tail triangles! This tail is on a child's costume so you might want to make them a little bigger for your own. The two green triangles have an 8" base & the height is 8" and the white triangle base is 4", height 8" (add about 1/2 for seam allowance) that makes the tail about 8" wide at it's base and it 7" high. Does that make sense? :) I would love to see the finished project!
ReplyDeleteoh, and I only have 4 followers, but thousands of hits thanks to pinterest! :)
That makes sense! Thank you! I appreciate it. I think the eyes will give me a bit of trouble as well as the nose but I'll try my best! I'll definitely keep you posted on the project and ask any other questions I have. I couldn't tell from the other site if there are actual patterns for the nose but it looked just like it was a picture and the chalk outlines.
ReplyDeleteI did the nose completely different than the tutorial, because I couldn't figure out what the tutorial was trying to say. I examined the nose of a stuffed Yoshi very carefully and basically made a circle, then cut triangular notches around the edges (I can't remember the exact science of it, but I think there were six notches to make it more oblong than circular and a couple of the notches were shorter) and then sewed the notches up. If you have a stuffed Yoshi, check him out, he'll give you much guidance!
ReplyDeleteI did the eyes differently too, and stuffed them with cotton instead of foam. I wish I had taken pics while I was doing it now!